Photo Equipment
BULBS TYPES USED
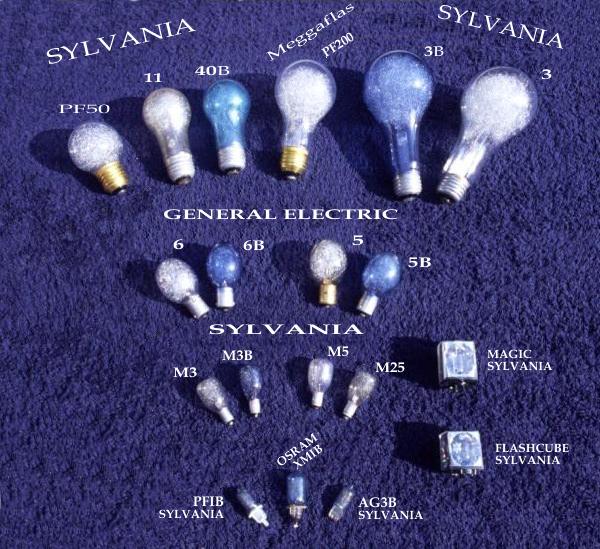
Depending on the size of cave passages or chambers, I use one type or a combination of flash bulbs.
As guides numbers based on manufacturer´s data are not accurated enough, I have made my own calculations in order to get a specific guide number for each of the reflectors with different flashbulbs.
Guide numbers have been calculated taking a series of photographs of a person, with the caver at the same distance but a different apertures. Once the slides were processed, I chose the best exposure. The results are as follows:
| BULBTYPE | FITTING | GUIDE NUMBER ( In meters/100 ASA Film) |
| AG3B | AG Capless | 36 |
| XM1B | PF Capless | x1 » 28 x2 » 40 x3 » 48 x4 » 55 |
| #5 | BAYONET | 65 |
| #5B | BAYONET | 45 |
| #6 | BAYONET | 65 |
| #6B | BAYONET | 45 |
| #2 | EDISON SCREW | 140 |
| #2B | EDISON SCREW | 90 |
| PF50 | EDISON SCREW | 60 |
| PF200 | EDISON SCREW | 110 |
| FLASHCUBE | CUBE | 21 |
| MAGICCUBE | CUBE | 21 |
BULB FLASHGUN
Bulb flashguns are collector´s devices. I purchased them second hand, they have been modified to alter some its caracterestics.
Bulb flashgun can be trigged manually or connecting to a slave unit.
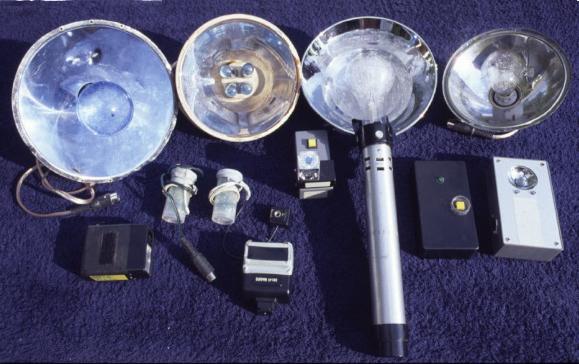
The flashguns in the top row (left to right) are:
An adapted traffic light reflector with an edison screw fitting, an old car headlight reflector adapted to fire up to 4 XM1B flashbulbs, a Graflex flashgun for edison screw flashbulbs and another headlight reflector adapted to fire bayonet flashbulbs.
The botton row shows:
A small electronic flashgun, two infrared slave units, a small electronic flashgun covered up with an infrared filter, a device to fire flash cubes, a black case containing the electronic system to connect to the reflectors in the upper row, and finally a case with a small flashgun to fire capless flashbulbs.
Following is the description of how to build the flashgun for XM1B bulbs (this is an article I published in the magazine Cave Photography Group, february 2004):
The material can be divided in three parts, the first one are the flashbulbs adapters, hard to get. The second one is the reflector and finally the flashgun or the electronic system to fire de bulbs.
After some inquiries I got some PF1 bulb to bayonet adapters. I got a good smooth polished reflector from an old car headlights. I was in the need of using something to hold the adapters together with the reflector, I bought a rubber tap and I drilled four holes to contain them. I welded the wires to the adapters and I adjusted everything so I got the reflector and the adapters ready.
Then the final step came, the flashgun electronic system. I used the circuit that is described in the book Images Below by Chris Howes on page 38. The electronics are as follows: 2500 ohms Resitor; 100 mf/25 v Capacitor; 18 volts battery; one led; DIN socket; a switch and a pair of connectors.
First I tried a 100 mf/25 v capacitor with 18 volts battery (two 9v battery in series). When I tested it I realized it wasn't powerful enough to fire the four bulbs altogether, just two of them were fired, so I replaced it for a 330 mf/25v capacitor, it takes longer to recharge but is able to fire the four bulbs.
A led is placed in the circuit in order to check if the bulbs works. A second utility for the led is in case the device is connected to a slave unit and that was on, you can see the led glowing and prevents you from special surprises. I also used a DIN socket so it can be connected to a slave unit.
I checked the device's guide number for 1, 2, 3 and 4 bulbs. The results were:
| BULB TYPE: OSRAM XM1B. FILM SPEED 100 ISO/ASA | |
|
NUMBER OF FLASHBULBS |
GUIDE NUMBER |
| 1 | 28 |
| 2 | 40 |
| 3 | 48 |
| 4 | 55 |

» Smooth polished reflector together with the rubber tap and the adapters once are joined. XM1B bulbs can be seen.
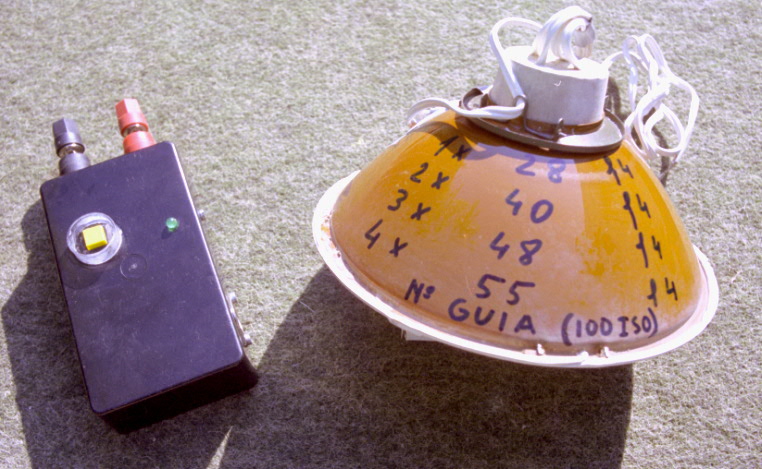
» The plastic box that holds the electronic fire system. The green led and the manual switch can be seen on the box. On the right side of the box a DIN socket was placed for slave unit connection. Finally at the top of the box the connectors are seen.
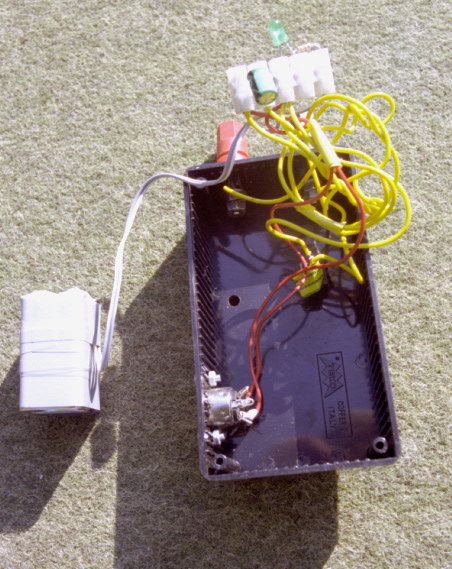
» Inside the box we find the battery (two 9 volts battery in series), the green LED (at the top), by the LED a resistor was placed, the capacitor is just to the left of the LED.